

Getting Started with Git and GitHub: A Beginner's Tutorial
Learn the Basics of Version Control and Collaborative Development with Ease.

Here you will find my blogs related to tech and experiences.
Are you new to the world of version control, looking to contribute to open source, or want to collaborate with others on your projects?
Look no further than Git and GitHub.
Git is a powerful and popular version control system that allows developers to track changes to their code over time, while GitHub is a web-based platform that provides a centralized location for hosting and collaborating on Git repositories. In this beginner's tutorial, we'll explore the basics of Git and GitHub, including key vocabulary and concepts that will help you get started on your journey. We will learn how to create a repository and push your code publicly on GitHub with our step-by-step guide.

You may be curious about the term "version control" that we often encounter. Let's dive deeper into this concept...
What is Version Control?
Version control, also known as VCS, is a crucial tool for software development teams. It enables them to track changes made to a project's codebase over time, allowing for easier collaboration and maintenance. With version control, teams can work on the same codebase simultaneously, run tests, patch issues, and add new code with the confidence that any version can be retrieved at any time. This results in more efficient development processes and higher-quality code.
Git and GitHub Vocabulary
Let's explore commonly used Git and GitHub Terminology.

source - https://github.com/sf-wdi-21/notes
Repo
In simple terms, a Repository (or repo) is a folder or directory that contains all the files and folders necessary for a project, as well as the history of changes made to those files over time. The repository can be stored locally on a developer's computer or remotely on a web-based platform like GitHub.
Clone
Clone refers to the process of creating a local copy of a remote repository on your computer. A Cloned repo will continue to synchronize with the target repository. Cloning can be done using the command line and requires the URL of the remote repository that you want to clone.
Let's say you want to clone React repository. The command for that would be -
git clonehttps://github.com/facebook/react.gitCommit and Push
a Commit is a saved change to a repository's codebase. When you make changes to your code locally, you can use the "git commit" command to save those changes to your local repository. whereas Push refers to the process of sending your changes from your local repository to the remote repository on GitHub.
Summing up, git commit saves repository changes locally but not on the remote repository. Contrarily, Git push then updates your git commit changes and sends them to the remote repository.
Branch
a Branch is a separate version of a repository's code that can be modified independently of the main codebase. Think of it as a copy of the code that you can experiment with without affecting the main project. You can use branches to develop new features, fix bugs, or make other changes to your project, and then merge your changes back into the main branch when you're ready.
Local and Remote
You must have often come across this word as someone might have said to you "Push your changes to remote repo". What does that actually mean?
Local refers to the version of the repository that is stored on the developer's computer, while Remote refers to the version of the repository that is hosted on a web-based platform like GitHub. Developers can make changes to the code in their local repository and then push those changes to the remote repository on GitHub so that others can access and collaborate on the code. Similarly, developers can also pull changes made by others in the remote repository into their local repository to keep their code up-to-date.
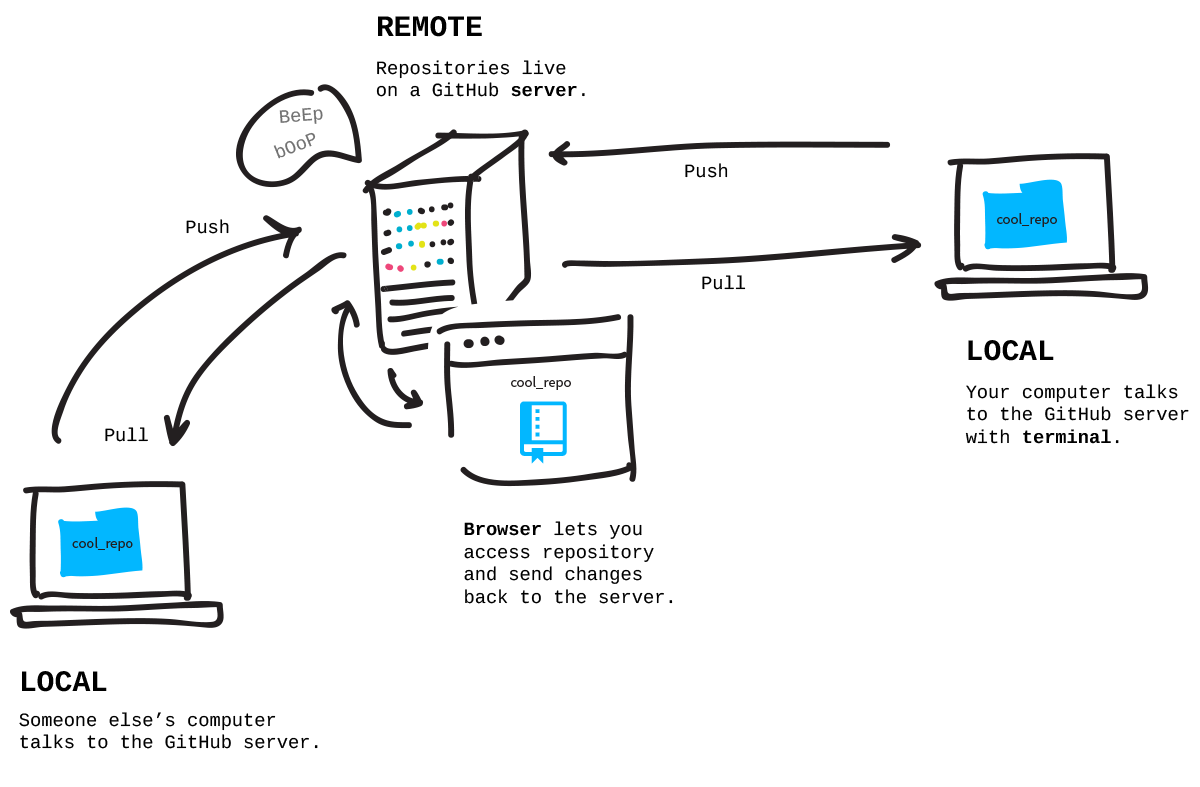
source - http://jlord.us/git-it/challenges/remote_control.html
Fork
A Fork creates a completely independent copy of the Git repository. When you fork a repository, you create a new copy of the project under your account, which you can then modify and push changes to.
Origin & Upstream
Origin refers to the default remote repository that a local repository is synchronized with while Upstream refers to the original repository that a forked repository was created from.
In simple terms, To make a copy of the original repository into a user's account, Git provides you with an option called forking. Once forked, the original repository is referred to as upstream and the forked repository is referred to as the origin.
Developers can sync their forked repository with the upstream repository to keep their code up-to-date with any changes made to the original repository.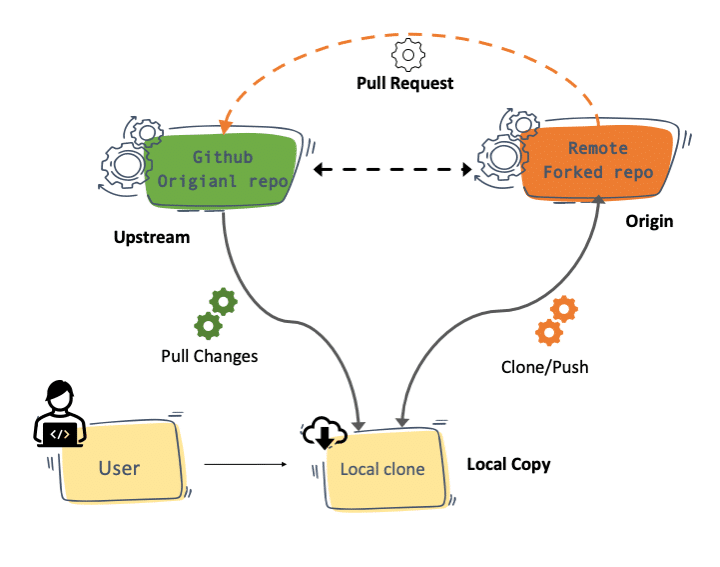
source - https://devopscube.com/set-git-upstream-respository-branch/
Pull Request
It is a feature that allows developers to propose changes to a project hosted on GitHub. When a developer submits a pull request, the changes they have made are reviewed by other developers, and if approved, the changes are merged into the original repository.
Merge
a Merge refers to the process of combining changes from one branch into another branch. When a pull request is approved and merged, the changes made in the branch are integrated into the target branch, allowing multiple contributors to work on the same codebase simultaneously.
Creating a new repository
So now let's look at how we can create a new repository and set up our project.
Log in to your GitHub account.
Click on the green
Newbutton in the repositories section.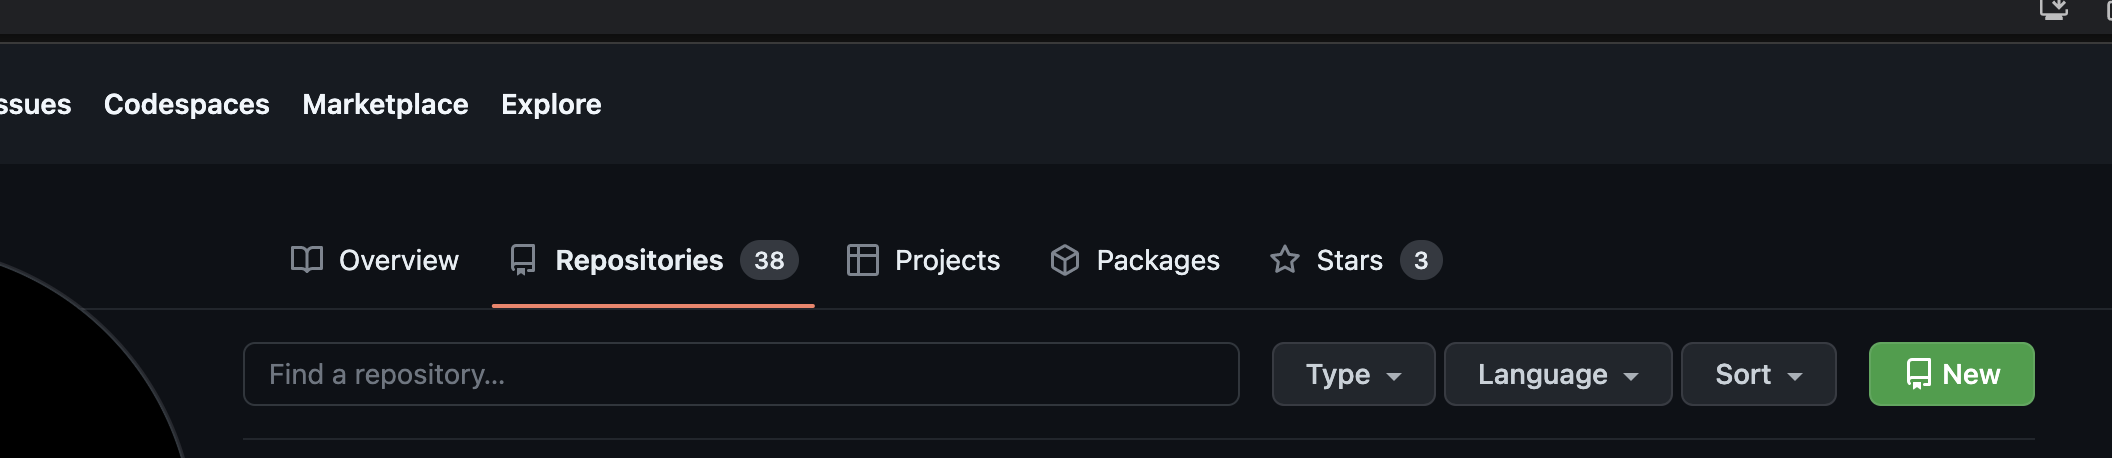
Fill in the required details of your repository.

Now you have three ways to proceed with this newly created repository as stated in the below screenshot. (The steps are mentioned for each step.)

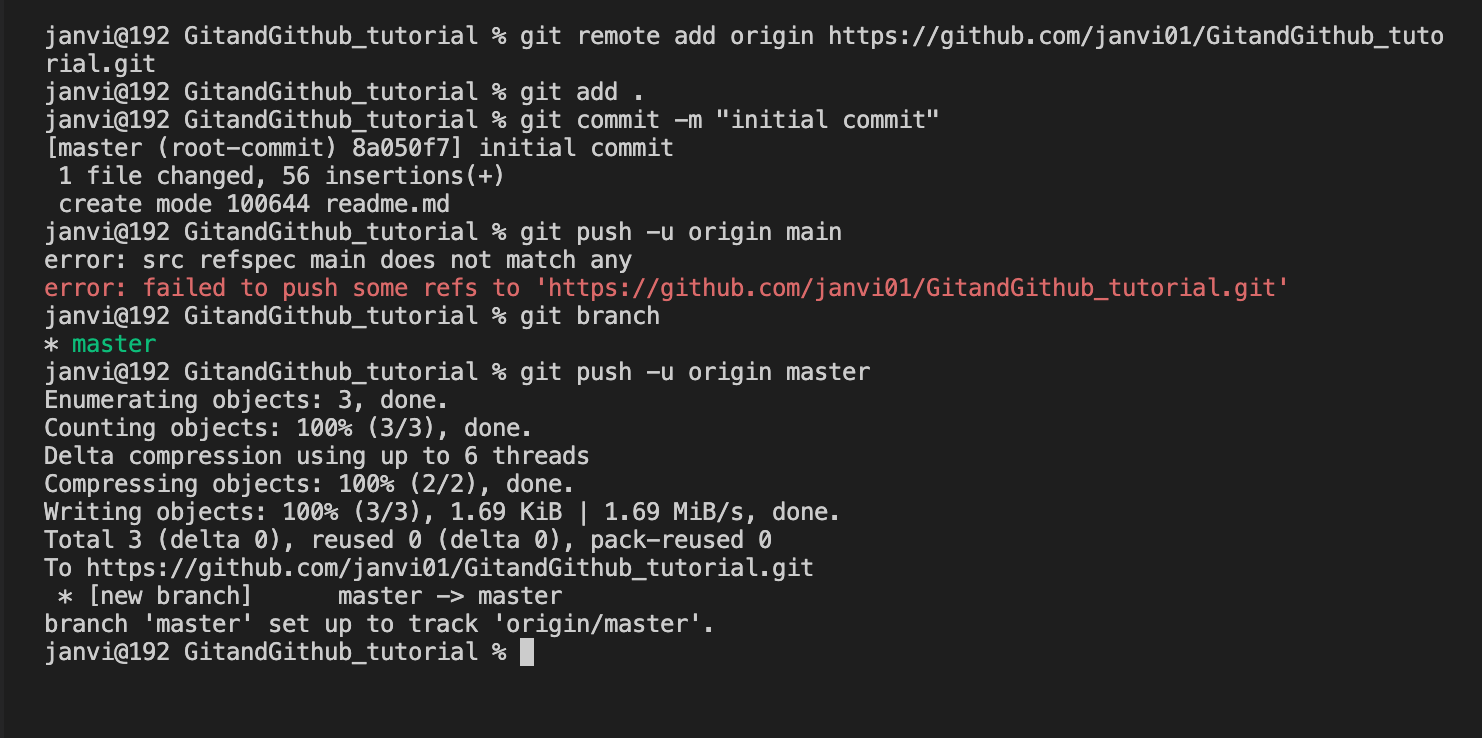
Let's proceed with the second one, push an existing repository from the command line. So I have created a folder locally having a readme file and now I will push that folder to GitHub following these steps.
1. Added remote origin using git remote add origin https://github.com/janvi01/GitandGithub_tutorial.git
2. Added files using git add <filename>
3. Committed files using git commit -m <commit message>
4. Pushed files to the origin repository using git push .
For reference, this is the repository link that is created in this tutorial.
Woahhh, done! 🚀 You've successfully created a repository. Now you can work on amazing projects and share your code with the world.
Thanks for reading! I hope you find this blog post useful. You can connect with me on Twitter or LinkedIn. 🚀❤️


